|
| |
Instructions
| Navigation (these items are Flash buttons which are updatable by editing a
text file): |
| |
|
To edit these buttons you will need the "intro-button..txt"
text file found in the "flash" folder.

-
open the intro-buttons.txt file using
FrontPage 2003, Dreamweaver, or windows notepad (for windows
notepad, select the file, right click, and select OPEN with windows
notepad)
-
change the link names, messages, and hyperlinks as
an example:
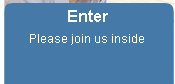
-
to change the button name:
edit the 'text' after the = sign, ex:
&introBtn1=Enter
Change to
&introBtn1=New Page
to change the message this button displays:
edit the second line of text, after the =sign. ex:
&introBtninfo1=Please join us inside
Change to
&introBtninfo1=This is your new message
to change the button hyperlink:
edit the 'page.htm' after the = sign, ex:
&introURL1=home.htm
Change to
&introURL1=new_page.htm
-
-
save the changes, and preview your page
To edit these buttons you will need the "icons..txt"
text file found in the "flash" folder.

-
open the icons.txt file using FrontPage 2003,
Dreamweaver, or windows notepad (for windows notepad, select the
file, right click, and select OPEN with windows notepad)
-
change the URL link , and the Link name
save the changes, and preview your page
|
| Flash Messages (you can edit these message
taglines, using FrontPage, Dreamweaver, or windows notepad): |
| To edit these buttons you will need the "header.txt" |
|
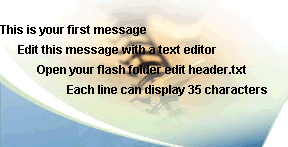
-
open the 'header.txt' file, located in the flash
folder
-
edit the text: ex: to edit the first
line of text, change the first line
&message1=This is your first message //
change to &message1=Welcome to our website,
thanks for visiting
-
save and preview your webpage
|
| Text - regular HTML (we have included dynamic
'include' pages for the following elements): (for FRONTPAGE USERS ONLY) |
| To edit these elements, open the assiciated pages in the includes
folder. Once you've edited the pages in the includes folder, all pages
using that 'included element' will be updated. |
|

-
to edit the copyright information, open the
'includes' folder, then open the 'copyright.htm' page.
-
once you've made your changes, save the page, and
'ALL' pages in your website will be updated

-
to edit the HORIZONTAL NAV BAR , open the 'includes'
folder, then open the 'horizontal-links.htm' page.
-
once you've made your changes, save the page, and
'ALL' pages in your website will be updated

-
to edit the COMPANY TAG LINE , open the 'includes'
folder, then open the 'tagline.htm' page.
-
once you've made your changes, save the page, and
'ALL' pages in your website will be updated
|
| Logo Updates:

We can do this for you, or you can do it yourself. Service options listed
below:
- We modify the generic logo (a $25 value) for FREE. We will
modify this logo, you provide the words and we'll modify the generic
logo image.
- Or you can provide your own graphic logo image, and we can
provide a quote for installing this for you.
|
| Your logo is an 'image' embedded into the webpages, and the intro
pages, using a SWF, or flash animated file. To remove the logo, and
add your own, you can do one of two things:
1. Add your logo using Swish.
- open the logo.swi (Swish 2.01 or Swishmax) file, located in
the editables folder
- remove the generic logo from the 'outline' pane'
- import your own image (using the outline panels - import
image option)
- line your new image up over the 'background' image
- THEN DELETE THE BACKGROUND IMAGE, this image is only present
in the 'logo.swi' file, to help you line your new logo image up
correctly.
2. Add your logo to the background image on the webpage.
- delete the 'logo.swf file from the flash folder
- start your favorite graphics program
- edit the background graphic for the intro page by importing
the "INTRO-BG.JPG' image located in your images folder
- add your own logo image to the intro-bg.jpg
- save or export the updated image
repeat the steps above for the template pages, but import the
't1b.jpg' image, also located in the images folder
|
| Images in flash intro, and template pages: |


These images are used for both the flash intro and WITHOUT the need for flash. The images are loaded into a
flash file externally. Therefore you can replace the images by opening
the flash folder and editing the following images.
For the intro page: to replace these images,, just create a
new images with the following dimensions: (175 pixels wide x 210 pixels
high), save as a jpeg image and name them as listed below. Then save to the
flash folder, to overwrite the existing images.
intro-image1.jpg
intro-image2.jpg
intro-image3.jpg
intro-image4.jpg
And for the template pages, same as above, but use the following
dimensions (510 pixels wide x 149 pixels high)
header-left1.jpg
header-left2.jpg
header-left3.jpg
header-left4.jpg
And finally, you can replace the background image, under the 'flash
messages (310 pixels wide x 185 pixels high)

right-image1.jpg
|
|
| |
| |
| Removing the Flash Intro |
| 1) make sure you shut down and restart FrontPage (important for
various reasons) |
|
2) open up the home.htm page |
| 3) go to your File menu and select Save As -- save as "index.htm" |
| 4) delete your home.htm page |
| 5) do a broken link check for "home.htm" and replace all links with
"index.htm" |
|
|
|
|
|
|
|
|
| |
Copyright 2008 ©
Creative Dreams All rights
reserved.
|
|
|
|
|
| |
This is your news area. Add images,
banners, or text. |
|
|
|
|
|
| |
|